Monday, January 7, 2013

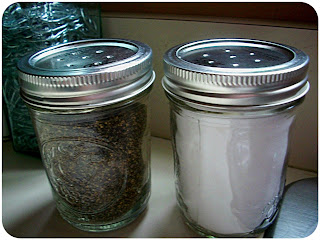
Mason Salt and Pepper Shakers

Hey kids :]
I'm a little excited because I actually have a tutorial for you all. And it's seriously the easiest thing evvaar.


Mason jar salt and pepper shakers! Yes, I finally gave in and started making things out of mason jars, rather than just letting mine be sad and lonely in the pantry haha.
But we had no real salt and pepper shakers in the apartment, so I thought it was about time--

Here is how you can make your own! Seriously, its so simple and I don't know why I didn't do it sooner.


Step One: Gather your materials- jars with lids, a hammer and nail, and something to nail on top of [I just used a piece of scrap wood.]


Step Two: Locate the lids and mark them where you want to punch the holes. I marked one hole in the middle with six holes around it.


Step Three: Use the hammer and nails to punch them holes, yo. Just... don't use a super huge nail I guess... unless you like really salty food haha.


Step Four: Fill your new shakers up with salt and pepper, and you're ready to cook like a pro! A really... somewhat red-necky... pro....


I'd say mission accomplished :]


But yerp, linkin' up to Savvy Southern Style and other great parties OVER HER.

Sunday, January 6, 2013

Oatmeal Scarf

Remember when I said that I've been crocheting a lot?
I've been crocheting a lot.

And this week I ended up crocheting my first infinity scarf--
I enjoy the whole infinity scarf fashion/deal/thing, so I thought it was about time I finally make one. I mean, the fringe monstrosity was born a few weeks ago, so WHY NOT YARN.


Cue dramatically lit pictures of said scarf.
[I can't help it, it was SUNNY for once]

I got some Homespun yarn for half price, which I've never really worked with before. But the scarf ended up pretty darn fluffy and obnoxious [in a good way]. I didn't really use a pattern because.... reasons... but if anyone is interested in making their own, I can attempt to write one up for this one.


Have a pleasant Sunday, kids.


Linkin' up to these PAAAARTIES!


Friday, December 28, 2012

Kristy's Owl

Evenin!
Whelp, in my last post, you got to experience just a little bit of my limited sewing skills. But the good part is that I'm still practicing! I really do enjoy sewing and making things, not gonna lie, so I refuse to give up on it just yet haha

Sooo, for one of my other dear friends [and she's my roommate to boot!] I decided to practice sewing a little more by making her this little fella:


I had some extra fleece lying around, and she really loves owls, so I thought it might be a pretty good fit.


I have quite a few things that I would like to change for next time, but for a quick project to whip up, I'd say it was a pretty good first try!


And he will be linkin' up to some of THESE parties!

Thursday, December 27, 2012

Fringe Scarf

Greetings, compadres!

I think that my favorite gift that I made this year ended up being this one:


I made this fun fringe-y scarf for one of my very, very dear friends, Carolyn. And I really hope she ends up liking it! and if she doesn't... then... Idk. I plan on making one for myself anyway :]

AND WELL LOOK AT THAT. I took pictures so that you can make your own! Don'cha know.
So let's get started!


Step one: Find yourself three yards of fabric. I used a stretchy knit fabric in this pretty grey color, but I guess as long as you use something mildly stretchy and nice-feeling, this would work. Can you tell that I'm SUPER versed in all things sewing? [haha NOT EVEN. I just like to putz around with sewing...] But yeah. Take your three yards and fold it in half long-style. Then cut your fabric all the way down the fold you just made. Now you will have two long sections of fabric, but you'll only need the one to make the scarf.


Step two: LOOK, MORE OF MY INFINITE SEWING SKILLS SHOWING. Haha oh gosh. But yeah. On each side of the fabric panel, measure in about five or six inches. The measurement depends on how long you want your fringes to be. But since I'm terrible at making straight lines, I used a tape measure to keep the line straight.


Step three: Mark your straight lines with straight pins. This will tell you where to cut the fringes to. If you have a marking pencil [which I didn't] you could just use that if you want...
WARNING: This was where my cat entered. This was BY FAR his most favorite thing I have ever made... so if you have a cat, be aware that they LOVE to help with this project haha.


 Step four: Start cutting your fringes once you have both sides all marked out. I cut each of mine a half an inch each, but again, size is up to you.


Step five: Appreciate what a good helper you have.


Step six: Once you have all the fringes cut, turn the fabric once so that there is one twist in it, like the photo above. Then line up the two straight edges of the fabric.


Step seven: Sew up your edges, and you're ready to wear your new scarf! I hand sewed mine, but that's only because I'm not very comfortable with a machine. You can go ahead and machine sew it though!


 And there you have it: a fun fringe-y scarf :]
I very much enjoy odd scarfs, so I hope Carolyn enjoys it too!


 If you make your own, I'd love to see! I feel like this project can be much improved on, so I'd love to see if anyone whips up something fantastic :'D


And I'll be linking to these great PARTIES!


Wednesday, December 19, 2012

Christmas Cardin'

Hooo boy.

Lately I've been doing ALL THE THINGS. So much to do, so little time, yeah?
Since getting off of school last week, I've been trying to rush to get everything ready for Christmas. Baking cookies, sending cards, making gifts, you know haha.

But yesterday I ended up finishing making Christmas cards for everyone.


I ended up making quite a few this year. It's like... you start to make cards for a few people... and then you think of more people... and then the next thing you know you end up making eight thousand cards.


But it's all fun, right? We only get to do this but once a year... so might as well enjoy it :]


Now I'm off to go finish making a million other gifts I guess.

Linkin' up to THESE great parties!

Wednesday, December 12, 2012

It's good to be back :'D

Hi friends.
Have I ever mentioned that I greatly enjoy oil painting?:


I swear, that is the FASTEST oil painting I have ever done.... 2 and a half days.... 16 x 20 inches... I don't even. NOT SLEEPING IS FUN, YEAH?
Oldest brother has been bothering me for the longest time that I should paint him a picture of a cow for his house. EEEEVERY time I see him, he asks "Where is my cow painting?" And I, like the loving sister I am, blatantly ignore his requests [I'm terrible].

So, in my free time I finally painted him a Christmas cow.


Look out for more nonsensical artwork in the month to come, I guess :]


PS: Linkin' up to these great PARTIES.

Thursday, August 16, 2012

DIY Designer Candles

Howdy kids.

So here's a thing. BEHOLD:


I made candles :]
Well, not really. I decorated candles. One of my roommates can only tolerate unscented candles, so I decided to make some boring, unscented candles more exciting:


Here's how I did it too-- Step one: Gather your materials. I used some tall pillar candles, microns [or any other fine point PERMANENT pens] tissue paper, push pins, and some sort of cutting apparatus [I used my trusty xacto and a cutting mat].


Step two: Use your candle to cut your tissue paper to the exact height of the candle, maybe even a tiny bit shorter. You can then wrap the paper around the candle to find out how long to make the paper. You will only need about 1/4 to 1/3 inch of overlap.


Step three: Lay you paper down on some sort of surface [I used just a piece of printer paper] because the pen has a good chance of bleeding through. Then go ahead and draw whatever you want!


Step four: Wrap your finished drawing around the candle and push pin it together. You can also use drafting tape or painters tape to tape it down, which I found actually worked quite nicely.


Step five: Pull out your trusty blow dryer and BLAST that baby. You have to get enough heat so that the candle starts to melt a little and adhere the paper to the actual candle. You will be able to tell when this starts to happen because the wax will start to bead up through the paper.


Step six: Let your candle cool down and dry!


And there you go! Some designer candles for way less! I don't really know if you can burn these, but I wasn't really planning on burning them anyway, just have them as a display piece. To bad there is most likely no room for displaying things at the apartment haha


Added tip of advice: It really helps if you have a little kitty helper to watch over all your activities :]
ENJOY!

ANNNDD I'll be linking toTHESE parties!