Tuesday, June 25, 2013

Hounds-tooth Refashion

Howdy kids :]

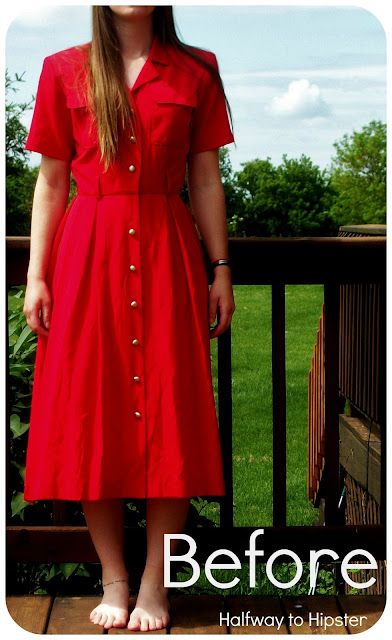
What have I been up to lately? Well, besides doing homework during the summer, which is literally the worst thing ever, I managed to refashion another frumpy dress:


Nothing says fun like a fake velvet collar, right? No? Oops...


Well, I did some major choppin' an this is how it turned out!


First I took out those LOVELY shoulder pads.


Then took off those DOPE fake velvet lined sleeves [which, I might add, were AWESOME for attracting cat hair...]


After that I cut off the collar, as well as cut the front of the dress to form more of a v-neck. Then I hemmed it all off and voila!


Now I have a slightly less frumpy, but still a little bizarre, frock :]

Happy Tuesday!


Linkin' up HURR and to HERE


Monday, June 24, 2013

BlogLovin'

Hey kids!

This is just a quick note to say that I finally joined BlogLovin'
So if you want to connect there, please let me know!

Follow my blog with Bloglovin

Happy Monday! [Since when are Mondays happy?]
And I have some other things I'm working on this week, so you might be seeing those soon :]

Friday, June 21, 2013

Red Dress Refashion

Confession.
I have a new obsession....
.... going to the thrift store and buying every frumpy dress there. Seriously. Yesterday was dollar day at my local Goodwill, and I definitely bought out a solid portion of the 80's. [which is only funny because I wasn't lucky enough to have lived in that decade...].

But yup. 
In my adventures in learning how to sew, I decided that it would be best if I just practiced on thrifted clothing. That way if I screw up, no big deal :]
I mean, so many people in the blogging community already do it, so that's acceptable, yeah? Yeah.


Here is the first dress that I snagged and gave a little makeover to:

Thrifted Dress Refashion

Whomp.

Thrifted Dress Refashion

Made slightly less frumpy! But still kind of frumpy because that's how we do.
And cowboy boots.

I didn't do anything too complicated to fix it up:


Just hacked out those darling shoulder pads [oh if only they were in style... but not really].


Chopped a few inches off the sleeves.


Cut a solid eight inches or so off the bottom.
Then hemmed everything all up! Which makes me desperately wish I had a sewing machine already... Why tuition, whyyyy.

Thrifted Dress Refashion

Perfect for frolicking through fields right? RIGHT.
I have a few more dresses that I'm refashioning right now too, so I'm still pretty excited :]

Happy Friday!

Linkin' up HURR and HURR

Tuesday, June 18, 2013

Painted Geometric Flower Pots

Greetings little fellas :]

How is everyone enjoying this Tuesday?
I know my cacti are enjoying today because, LOOK.


Cacti need a little love too, right? Just because they have a spiny exterior doesn't mean they don't yearn for companionship and attention just like anyone else...

[I have a problem with cacti actually. I've managed to kill about three or four cacti since freshman year, but it's because I LOVED THEM TOO MUCH. They always looked so thirsty, how was I supposed to know not to water them so much?]

Care to see how I did mine?
Here we go then!


Step One: First I gathered all my items: Pots [and their accompanying dishes], a palette [or other item resembling that purpose], acrylic paint, and a myriad of brushes.


Step Two: Next I painted just the rim of the pot. Pretty simple right? You can tape it off to get straight lines if you so please, but I like living on the edge sometimes [tip of advice: don't hold your breath while painting straight lines. I subconsciously tell myself to hold my breath whenever I paint or draw straight lines... force of habit... and I really don't suggest it haha].


Step Three: Plug and chug some geometric designs on there! Think straight lines and it's bound to be interesting! For example, with this one, I just painted the straight up-and-down lines, then added zig-zags between them.


Or maybe start with a zig-zag, and then go for some straight lines.


And there you essentially have it! To finish mine off, I painted the insides of the pots black, and then did a band of both white and then black on their little dish/coaster/holder things.

In the end, I'm sure the kids will love their new pots! These are my two newest babies by the way. In the back is Lucy [nice girl, diabetic], and in front is the newest acquisition from New Mexico, Flannigan [his species is Red-Headed Irishman. For real.]. I'm still working on pots for Scooter and Prickly Pete, so I'll be sure to post those as well!

Enjoy yer Tuesday!


Linkin' up to HEEERE and HERE!

Tuesday, June 11, 2013

Men's Shirt to Women's Blouse

'Sup Bro-skis!

Look who's back: THIS KID.
This week y'all get to experience a little bit more of my amateur sewing skills. I keep thinking to myself lately "Man Becca, you really should have taken a sewing class in high school or something. Fo real." But since I decided to take 8 billion art classes instead, now I just kind of wing every sewing project haha.

Take a gander at what I've been up to though:


Whaaaaaaat.
I saw something kind of like this on Pinterest, but didn't quite think that it would look good on me. So I decided to just make one that suited my own tastes.
So here we go, yo:


Step One: First things first- you're going to need to get yourself a shirt [Shocker, I know]. I don't exactly know what size shirt I used, but it said "16-20" on the inside... whatever that means in real life [men's sizes whaaaat]. Then I went ahead and chopped the sleeves off since I would have needed to be jacked as hell for my arms to fill those bad boys out...


Step Two: Next I tried the shirt on and made a mark where I wanted the waistline of my blouse to be. Then made a straight chop across [using a ruler to keep my marking and chopping straight] [also, using a cat to... I don't know, be a cat].


Step Three: Trying the shirt on inside out, I pinned in the sides to get a more fitted... fit. Let me tell you... trying to pin things on yourself is just all kinds of awkward. I think there's some sort of disconnect between my brain and my arms being able to bend that way haha. But CONVENTIENT RED LINES TO SHOW WHAT'S UP YO. Then I sewed the pin lines up to the the arm pits and cut off the excess.


Step Four: Next I took in my shoulders, kind of like a normal tank top [rather than huge man shoulder style].


Step Five: Hem those bad boys off like a boss.


Step Six: With wrong sides up, I measured the top of my blouse against the bottom of the blouse. As you can see, the top is now much smaller than the bottom of the original shirt, which is important when we start to gather the bottom of the blouse.


Step Seven: I gathered the bottom of the shirt by running a long straight stitch all the way across its width, then pulling on one end of the stitch so that the fabric began to bunch. I don't have a sewing machine [because, well... I'm a poor college student], but if you do have a machine, here is a great and more thorough tutorial.


Step Eight: Gather the fabric so that it is the same length as the top of the blouse.


Step Nine: Pin the the top section to the bottom section, right rides together, and then sew the pieces together. And essentially, there you have it!


Just slap on a belt and you're good to go! Or not... Looks fine either way in my opinion, but who doesn't love a good cinched waist?


I'm still quite the novice with sewing, but dang, doesn't it feel great to wear something you know you altered yourself? It's the little things in life man, the little things haha.

Whelp, happy Tuesday y'all :]


And linkin' up to THESE and DIS par-tays!

Tuesday, June 4, 2013

Ripped Jeans to Shorts

I love making tutorials; I love to share the things I make, and I think it's fun when people share their process. Because let's be honest- who remembers exactly what they did 100 percent of the time? [Not me anyway... I instantly forget things.]
So I thought I'd maybe put some more tutorials together this summer :]

Let's start out with something easy though, yeah?


This has become somewhat of a yearly ritual for me. At the beginning of every summer, I recycle my beat up jeans into some more modest shorts [because I'm not entirely a fan of all the hoochie length shorts that stores try to shove on girls my age...].


Also, am I the only one who annihilates jeans during the winter? Because I feel like whenever I rip jeans, it isn't just a little tear. It's like they freaking went Titanic and destroyed themselves. Go big or go home I guess?


And I've learned that over time, covering the hole up with a cat simply does not work.... unfortunately...


So here is what I do! It's really common sense, but I just wanted to get back into the whole tutorial thing with something easy:

  1. Chop off the wreckage just above the top rip... or to a little longer than your desired length. Mine were [clearly] ripped pretty high, so I cut right above the rip to salvage a little more length.
  2. Fold them pants up and amputate the other leg.
  3. Fold the bottoms of the legs up twice on the outside and pin down, though I suppose you could do it on the inside too. I just like the looks of the outside hem better.
  4. Tack the hems down with a few stitches on the outer and inner existing seams. 

And there you have it! A brand new [old] pair of shorts from those ratty ripped jeans! Whoop whoop!


I'll be linkin' this puppy up HURR and to Savvy Southern Style, yo.