One of the upsides of going back to graduate school in the fall is that I get to move out of the garbage-hole of an apartment I have been living in for the past two years.
The downside? I'm going from a three bedroom apartment that actually had too much space for me to even use... to a 289 square foot studio apartment. We do what we gotta do in the name of education/living within our means, right? Right? Shhh, let me believe that I'm not an idiot, okay.
I'm actually pretty okay with this major downsizing though because it gives me a chance to reassess my possessions and completely redecorate a small, cohesive space. Because of that, I'm currently working on creating just some small decorative pieces to take with me when I move so that my new apartment feels a little more personal. One of the things that I think is going to work well in my space is this cute little beaded star garland:
It didn't take that long to make, and I think it's going to work well in the more neutral color palette that I think that I'm going to go with.
Curious about how I made it? Here is what I did:
First, I gathered all of my materials: some string (I used hemp), small beads that the string can fit through, felt, a scrap of poster board, a pencil, sharpie/chalk for marking the felt, hot glue, and some scissors.
With the scrap of poster board, I started by creating the pattern for my star. I just free-handed my shape, but you could easily just print a star shape from Google and trace that if you want to be super accurate. I like to be wild and crazy and live life on the edge though.
Next, I folded a section of the felt over and traced out as many star shapes in a row that would fit. Leaving the pins in to help with the cutting, I cut a double thickness of the felt for each star.
I continued in this fashion until I had as many stars as I thought I would need. I ended up with three black stars and eight brown ones so that I could create an alternating pattern. That was it for the stars for now-- next, I tackled the garland part itself.
To create the garland string, I cut a really long length of string/hemp which was longer than I wanted the end product to end up. And by really long length, I mean like..... 10 feet. Homegirl ain't playin' around.
For each bead that I wanted to add, I started by tying a knot in the string.
After tying the knot, I would slide on a bead and tie another knot. Then I would move over an inch, tie another knot, slide on another bead, tie a knot, and continue on until I'd have five beads in a row (with alternating colors of course because why not).
After every five beads, I would leave a large gap for a star to go in until I had room enough for each of the stars that I had cut out. And that was it for the garland string. The only thing left to do was to go about adding the stars.
To add the stars, I would lay down a star, add a little hot glue to the center, stick the string down, and then sandwich another star on top.
I wanted to give the stars a little more polish, so I just whip stitched around all of the edges. Now that I'm typing this out it almost seems like this took a lot of work... but in reality this surprisingly didn't take very long. An afternoon's worth of work maybe?
However long it took, I'm pretty sold on this little creation. I can just imagine it hanging above the window in my future cardboard box of an apartment, which is kind of endearing.
For now though, I just have it hanging on this palette (that I made!) in my parent's house until I can take it to my new tiny-home. You know all those tiny home shows on HGTV? I've always wondered what it would be like to live in one, so I guess that's how I can think of my new studio apartment... Ayyyy, that's a cool thought.
Linkin' up:
x x
Showing posts with label crafts. Show all posts
Showing posts with label crafts. Show all posts
Wednesday, June 29, 2016
Sunday, January 10, 2016
DIY Collar Clips
Long time no chat, eh? It's only been roughly.... 6000 years I believe.
Despite popular opinion, I have been doing things though! I've been tied up in a lot of different creative projects (but mostly just a lot of personal projects) over the last few months, so I have not had time to post anything. Excuses, excuses, I know. But hey! I do have some things at least that I plan on sharing before I disappear into another inevitable hiatus.
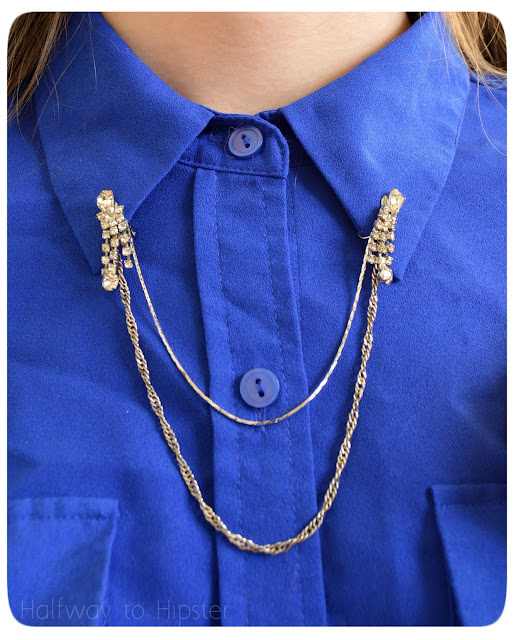
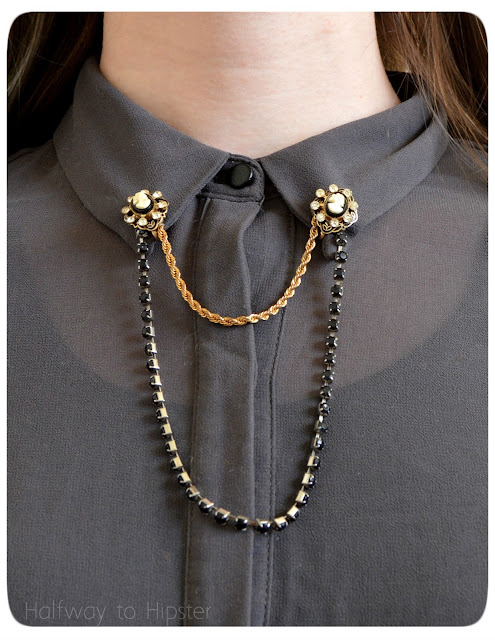
One of those things are these collar clips I made:
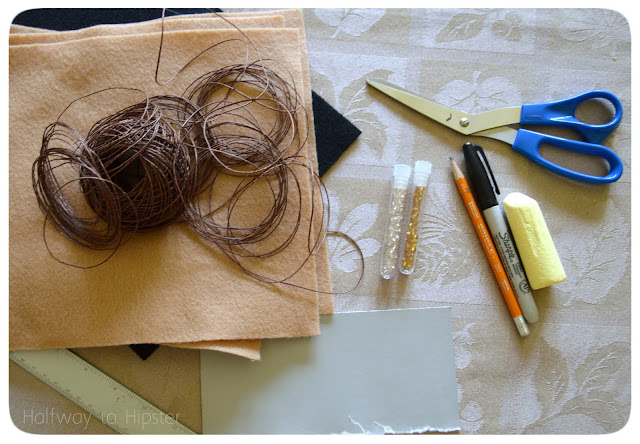
I started with materials that I already happened to have on hand: E6000 glue, pliers, and some old jewelery. The clip part of the collar clips were made with two pairs of clip-on earrings that different people had given me in the past. The faux diamond ones were my grandmas that she gave me and I was thrilled that I could finally find a use for them (I can't wear clip-on earrings due to the fact that I have too many ear piercings that I'm too lazy to take out.) The chains were just broken bracelets that I have been accumulating because I am a hoarder I knew that I could find a use for them.
The first thing I did was use the pliers to remove the clasps from the bracelets and trim the chains to the lengths I wanted.
Then, using the E6000, I glued the chains to the backs of the earrings, making sure that the chains didn't sit wonky.
After that, all I had to do was let them dry, making sure that the chains didn't slip out of place as they were drying.
And that was it. It was really that simple (though I realize now that I didn't focus these pictures very well. Shame on you, Becca).
But hey, I still think they look pretty jazzy. Now, to figure out how to make some moon clips...
Linkin up:
x x
Despite popular opinion, I have been doing things though! I've been tied up in a lot of different creative projects (but mostly just a lot of personal projects) over the last few months, so I have not had time to post anything. Excuses, excuses, I know. But hey! I do have some things at least that I plan on sharing before I disappear into another inevitable hiatus.
One of those things are these collar clips I made:
Lately I've been really loving buttoning my blouses all the way to the top. I don't know why, but it just feels more fun to have that top-button swag going on. And because of that, I felt the urge to try out the whole collar clip idea (is that even what they're called?).
The first place I saw them in action was with Clara in the episode "The Caretaker" of season 8 of Doctor Who, and while I still want to replicate hers, I think these will suffice for now.
| Source: x |
Can I just state the homegirl's fashion sense is so good? She's probably one of my favorite companions in terms of fashion sense... There are some other companions who should not have been allowed to dress themselves though (coughcoughrose).
But I digress. Here is how I made mine; they were crazy easy to do for myself:
The first thing I did was use the pliers to remove the clasps from the bracelets and trim the chains to the lengths I wanted.
Then, using the E6000, I glued the chains to the backs of the earrings, making sure that the chains didn't sit wonky.
After that, all I had to do was let them dry, making sure that the chains didn't slip out of place as they were drying.
And that was it. It was really that simple (though I realize now that I didn't focus these pictures very well. Shame on you, Becca).
But hey, I still think they look pretty jazzy. Now, to figure out how to make some moon clips...
Linkin up:
x x
Tuesday, December 10, 2013
Mod Podge Purse
Heeeeey....
Heh. Eheh. Ehhhh.....
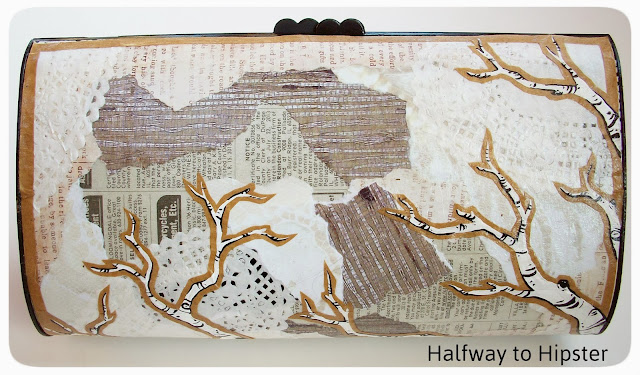
So one thing that I finished a while back was for a contest that a local boutique back home was holding:
What the contest basically entailed was that you were given a plain black plastic purse, and you had to decorate it any way that you wanted.
And for some reason, my train of thought took me in the direction of birch bark. I don't even sometimes.
All I really did for it was tear up a lot of scrapbook paper, phone books, paper doilies and brown paper bags and then mod podged it all on there haha. And then to finish it off, I painted some simple stylized birch branches and glued it all on top. Simple but fun, yeah?
Yay mod podge, yay.
And on the cool side, I actually ended up winning the contest. That's what sitting in your basement and hoarding craft supplies will get ya, kids. Live the dreeeeam~
And, as ever, I'll be linkin' up here!
Thursday, August 16, 2012
DIY Designer Candles
Howdy kids.
So here's a thing. BEHOLD:
I made candles :]
Well, not really. I decorated candles. One of my roommates can only tolerate unscented candles, so I decided to make some boring, unscented candles more exciting:
Here's how I did it too-- Step one: Gather your materials. I used some tall pillar candles, microns [or any other fine point PERMANENT pens] tissue paper, push pins, and some sort of cutting apparatus [I used my trusty xacto and a cutting mat].
Step two: Use your candle to cut your tissue paper to the exact height of the candle, maybe even a tiny bit shorter. You can then wrap the paper around the candle to find out how long to make the paper. You will only need about 1/4 to 1/3 inch of overlap.
Step three: Lay you paper down on some sort of surface [I used just a piece of printer paper] because the pen has a good chance of bleeding through. Then go ahead and draw whatever you want!
Step four: Wrap your finished drawing around the candle and push pin it together. You can also use drafting tape or painters tape to tape it down, which I found actually worked quite nicely.
Step five: Pull out your trusty blow dryer and BLAST that baby. You have to get enough heat so that the candle starts to melt a little and adhere the paper to the actual candle. You will be able to tell when this starts to happen because the wax will start to bead up through the paper.
Step six: Let your candle cool down and dry!
And there you go! Some designer candles for way less! I don't really know if you can burn these, but I wasn't really planning on burning them anyway, just have them as a display piece. To bad there is most likely no room for displaying things at the apartment haha
Added tip of advice: It really helps if you have a little kitty helper to watch over all your activities :]
ENJOY!
ANNNDD I'll be linking toTHESE parties!
Tuesday, August 7, 2012
Pop Tab Bracelets
Well howdy.
Good news: I got a bit of craftiness done today:
Pretty cute, if I do say so myself. And goodness me-- I managed to take pictures along the way so that you can make some for yourself!
Step one: Get your materials, yo. All you need is some ribbon [preferably not too skinny], scissors, and some pop tabs. I used about 18, and I'd consider my wrist pretty normal human-sized.
Step two: Cut yourself two lengths of ribbon. I used a little more than an arm's length [again with the super precise measuring haha].
Step three: This bracelet uses a the same technique as the hardware necklace did, except you have two holes to go through this time. So starting from the back of the tab, bring the two ribbons up through the pop tab, laving about four to five inches of ribbon to the left. You will be working from left to right on this.
Step four: Bring the ribbon down through the holes in the next pop tab.
Step five: Bring the ribbon back down through the first tab and pull it taut.
Step six: Now bring the ribbon back up through the second tab, in the little space to the right of everything.
Step seven: Continue adding tabs in this fashion until your bracelet is long enough. Then tie off the ribbons on both ends so that nothing comes loose!
Step seven: Because I enjoy clean-ness, cut the ends of your ribbons into nice, clean points :] Then all you need to do is tie it on an wear!
Tip of advice: I tied mine just big enough so that I could slip it over my wrist. Then I put a little tacky glue on the knot because I suck at tying bracelets on myself and wanted it to always have a nice clean bow haha
And there you have it! Pop tab bracelets! I love making things out of materials that I already have on hand :]
Annnnnnd, I just so happen to be linking to these great parties.
Sunday, July 29, 2012
Hardware Necklace
Long time no chat, yeah?
Linking to:
Keeping it Simple
Make it Great Mondays
Also, this is my entry into the Make it Great Monday party hosted by Appliances online and their best Range Cookers!
Cure for the Common Monday
Anyway, I wanted to share a little something that I whipped up last week. I saw a necklace kind of like this one on Pinterest [that's right, I finally caved last week and made an account haha] but for the life of me I can't find it anymore! So I had to just go with it and make my own:
Whoop whoop, almost fancy, and super easy to make!
Want to make your own? Here is how!
Step one: Gather your materials. You will need a pair of scissors, metal washers [whatever size you fancy], and some ribbon [also whatever size and color you fancy].
Step two: Cut a length of ribbon quite a bit longer than you want your necklace to be. I used a little longer than an arm's length of ribbon [you can tell I'm really precise, right?]
Step three: Place one washer on your work surface right side up. Then bring your ribbon up through the bottom of the washer. Don't leave your washer right in the middle of the ribbon though otherwise one side of your necklace will be super long and the other will be too short. I would move the washer over to the left more...
Step four: Place another washer right side up on your work surface to the right of the last washer. This time, instead of coming up through the bottom of the washer with the ribbon, come down through the washer with it.
Step five: Feed the ribbon back through the middle of the first washer, coming down with the ribbon.
Step six: Pull the ribbon nice and taut!
Step seven: Feed the ribbon back through the second washer, coming behind the first washer and up through the little gap on the right side of the second washer.
Step eight: Place your next washer right side up and feed the ribbon down through the center. Continue this process for as long as you want your necklace to be, but leave room so you can tie the necklace back on your own neck! haha
Step nine: This was just a personal choice, but when you get to the end of your necklace, you can cut the ends at points so they look nice and clean.
And there you have it! A hardware necklace! Hopefully, my brother didn't need any of those... but he should know by now that anything he leaves unattended in the garage instantly becomes fair game heh heh.
As a little tip, I left my ribbon pretty long, so that I could either wear it long or keep it short. I'm actually pretty partial to the short look :D
[and hoorah for fresh out of the shower pictures! hahaha]
Happy Sunday!
Linking to:
Keeping it Simple
Make it Great Mondays
Also, this is my entry into the Make it Great Monday party hosted by Appliances online and their best Range Cookers!
Cure for the Common Monday
Subscribe to:
Posts (Atom)


