Showing posts with label Jewelry. Show all posts

Sunday, January 10, 2016

DIY Collar Clips

Long time no chat, eh? It's only been roughly.... 6000 years I believe.

Despite popular opinion, I have been doing things though! I've been tied up in a lot of different creative projects (but mostly just a lot of personal projects) over the last few months, so I have not had time to post anything. Excuses, excuses, I know. But hey! I do have some things at least that I plan on sharing before I disappear into another inevitable hiatus.

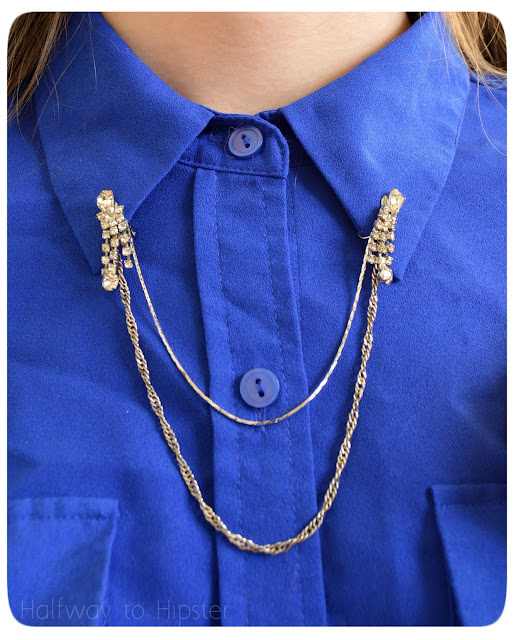
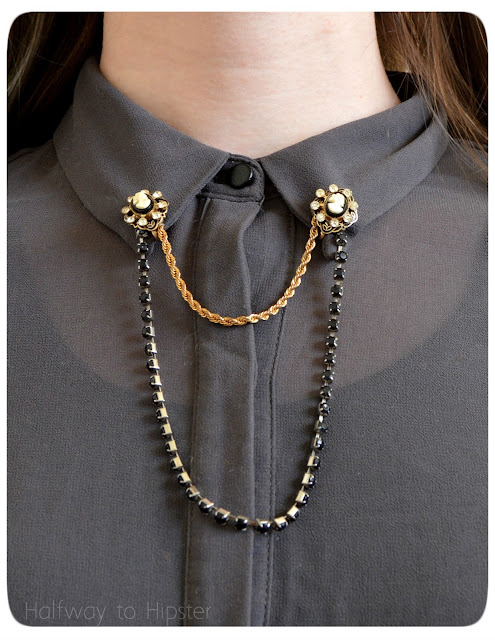
One of those things are these collar clips I made:


DIY Collar Clips

Lately I've been really loving buttoning my blouses all the way to the top. I don't know why, but it just feels more fun to have that top-button swag going on. And because of that, I felt the urge to try out the whole  collar clip idea (is that even what they're called?).

The first place I saw them in action was with Clara in the episode "The Caretaker" of season 8 of Doctor Who, and while I still want to replicate hers, I think these will suffice for now.

Source: x
Can I just state the homegirl's fashion sense is so good? She's probably one of my favorite companions in terms of fashion sense... There are some other companions who should not have been allowed to dress themselves though (coughcoughrose).

But I digress. Here is how I made mine; they were crazy easy to do for myself:

DIY Collar Clips

I started with materials that I already happened to have on hand: E6000 glue, pliers, and some old jewelery. The clip part of the collar clips were made with two pairs of clip-on earrings that different people had given me in the past. The faux diamond ones were my grandmas that she gave me and I was thrilled that I could finally find a use for them (I can't wear clip-on earrings due to the fact that I have too many ear piercings that I'm too lazy to take out.) The chains were just broken bracelets that I have been accumulating because I am a hoarder I knew that I could find a use for them.

DIY Collar Clips

The first thing I did was use the pliers to remove the clasps from the bracelets and trim the chains to the lengths I wanted.

DIY Collar Clips

Then, using the E6000, I glued the chains to the backs of the earrings, making sure that the chains didn't sit wonky.

DIY Collar Clips

After that, all I had to do was let them dry, making sure that the chains didn't slip out of place as they were drying.

DIY Collar Clips

And that was it. It was really that simple (though I realize now that I didn't focus these pictures very well. Shame on you, Becca).

DIY Collar Clips

But hey, I still think they look pretty jazzy. Now, to figure out how to make some moon clips...


Linkin up:
x x

Friday, June 13, 2014

DIY Wrap Bracelet

Don't you just love it when you decide to make a pin off of Pinterest, and it ACTUALLY turns out? I don't know bout you all, but it seriously makes me feel like I have my life together.

I ran across THIS PIN some time ago, and decided to give it a go. Only, I was too lazy to go to the craft store to buy the required materials, thus mine turned out a little different:

DIY Wrap Bracelet

I pretty much followed the directions, only I substituted brown thread and hemp for the leather and fishing line.

DIY Wrap Bracelet

I also just used bugle beads instead of the big fancy beads because... again... I'm lazy. And I already had all these things, so that counts for something, right? Using up materials? So they don't go to waste? Yeah, that's it....

DIY Wrap Bracelet

I thought about making an actual pattern with the colors of the beads, but I kind of like how the random colors worked out. My whole policy with making this was "whatever color I pick up, I put on," which actually made life a little easier. Heeeeh.

DIY Wrap Bracelet

Overall, this was a really easy project! I haven't made any beaded things like this in a while, so it was quite fun to get back into it, even if it was just for one project. When I was a kid I was ALL about making beaded things. I mean, ALL. So I def recommend checking out the directions if you would like to make your own!!


Linkin' up:
x x x

Thursday, May 22, 2014

Upcycled Dog Tag Jewelry

Oftentimes when I come home, I end up being confronted by my mother as such:

Mom: Becca. Look. I got these things.
Me: Yo. What. Oh. Okay.
Mom: Make something.
Me: Word.

*Direct quotes.

And it usually ends up with me creating something weird, but that's really no different than any other day of my life.
So last time I came home [... or some time... I don't remember... it was a little while ago], my mother showed me that she bought an entire jar of old dog tags. Why? Because of reasons I guess.

Therefore, I decided to upcycle them into some fun jewelry:

Upcycled Dog Tag Jewelry

I have never seen dog tag like these ones before, but she got them from an antique store in the next town over [shout out to the tag that says Lucifer on it].

Upcycled Dog Tag Jewelry

Once she gave me the tags though, I really just sat down and played around with some materials that I found in my basement: hemp, alligator clips, beads, glue, other items, and what not.

Upcycled Dog Tag Jewelry

I did three main strings on both the necklace and bracelet-- one to contain the tag, a braided hemp strand, and a last string with knots and beads.

Upcycled Dog Tag Jewelry

Then at the end, I just used some copper wire to attach all the strings together, then glued them with E6000 so that they stayed super-attached to the alligator clips. And just like that-- new life to old dog tags!

Upcycled Dog Tag Jewelry

Side note: take note of the hella-dope para-cord bracelet that my oldest brother made me. I like to tell people that he enjoys man crafts. Because it's true.


But yeaaaah. These were pretty fun to make, and it was fun to give new life to another old material! Now I'm tempted to make something out of Gypsy's old rabies tags just because... hmmmm....


Linkin' up:
x x x

Tuesday, August 6, 2013

DIY Vintage Tag Necklace

Howdy kids :]

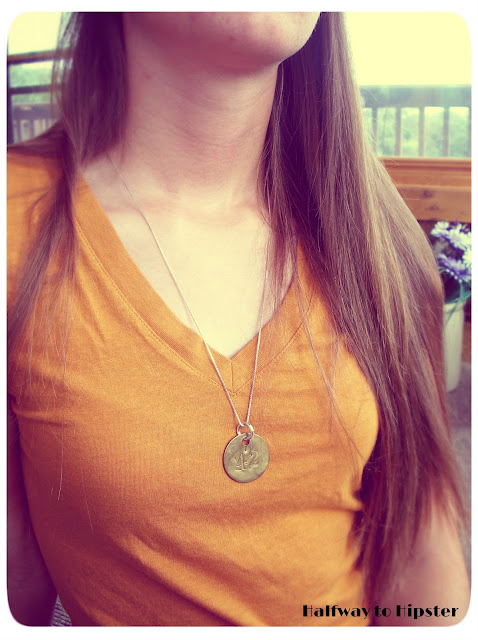
So the other day, I managed to re-purpose/whip up a fun little necklace that I am absolutely adoring:

Vintage Tag Necklace

It all started out with a trip to this tiny little town about 20 minutes from where I live [Let's be honest- everything is at least 20 minutes away from where I am living right now...].

Vintage Tag Necklace

I was planning on buying some old coins [which I did anyway haha] for a project that I'm thinking of making, when I ran across this old tag. I have no idea what it is from... but it reminds my mother of the old tags that they used to have on pool lockers from back in the day. Does anyone have any idea of what it could be? Regardless, I thought it was too fantastic to leave behind--

Vintage Tag Necklace

And it was literally the simplest thing ever to turn it into a necklace. All I did was break out some pliers [please excuse the fact that mine are part of a Swiss army knife...] and attach a thick jump ring to the tag. And there we have it! Just 30 seconds and you have a fabulous new necklace from an unexpected object.

Vintage Tag Necklace

All I did to complete the necklace was put it on a long silver chain. I love the mix of metals :]
And as weird as it sounds, I think I want to make necklaces out of other weird tags now... Like my cat's old rabies tags. JUDGE ME.


Happy Tuesday kids :]


Linkin' up HURR and HURR.

Sunday, July 29, 2012

Hardware Necklace

Long time no chat, yeah?

Anyway, I wanted to share a little something that I whipped up last week. I saw a necklace kind of like this one on Pinterest [that's right, I finally caved last week and made an account haha] but for the life of me I can't find it anymore! So I had to just go with it and make my own:


Whoop whoop, almost fancy, and super easy to make! 
Want to make your own? Here is how!


Step one: Gather your materials. You will need a pair of scissors, metal washers [whatever size you fancy], and some ribbon [also whatever size and color you fancy].


Step two: Cut a length of ribbon quite a bit longer than you want your necklace to be. I used a little longer than an arm's length of ribbon [you can tell I'm really precise, right?]


Step three: Place one washer on your work surface right side up. Then bring your ribbon up through the bottom of the washer. Don't leave your washer right in the middle of the ribbon though otherwise one side of your necklace will be super long and the other will be too short. I would move the washer over to the left more...


Step four: Place another washer right side up on your work surface to the right of the last washer. This time, instead of coming up through the bottom of the washer with the ribbon, come down through the washer with it.


Step five: Feed the ribbon back through the middle of the first washer, coming down with the ribbon.


Step six: Pull the ribbon nice and taut!


Step seven: Feed the ribbon back through the second washer, coming behind the first washer and up through the little gap on the right side of the second washer.


Step eight: Place your next washer right side up and feed the ribbon down through the center. Continue this process for as long as you want your necklace to be, but leave room so you can tie the necklace back on your own neck! haha


Step nine: This was just a personal choice, but when you get to the end of your necklace, you can cut the ends at points so they look nice and clean.

And there you have it! A hardware necklace! Hopefully, my brother didn't need any of those... but he should know by now that anything he leaves unattended in the garage instantly becomes fair game heh heh.


As a little tip, I left my ribbon pretty long, so that I could either wear it long or keep it short. I'm actually pretty partial to the short look :D
[and hoorah for fresh out of the shower pictures! hahaha]

Happy Sunday!


Linking to:
Keeping it Simple
Make it Great Mondays
Also, this is my entry into the Make it Great Monday party hosted by Appliances online and their best Range Cookers!
Cure for the Common Monday

Wednesday, July 4, 2012

Hipster Buttons

Heerrrrrrro
As you can probably tell, I've recently discovered the photo editing software Pixlr.
And now my new favorite thing is to hipst the heck out of photos haha. For instance, I decided to hipst these picture of some buttons that I made recently:


Ooooooh, Ahhhhh, so hip xD
If you're interested in editing your own photos, Pixlr can be found Here


:]

Thursday, June 28, 2012

Daisy Chains

Top o' ta mornin to ya
I wish I had an excuse for not making more exciting posts, but I really don't... such is life I guess haha.

Last night, I decided to pull out some beads and make a thing. Man, when I was a kid, I was ALL about beading. Then it kind of fell to the back burner once I started to become interested in the fine arts... But I'm glad I'm still capable of making something wearable every now and then haha


I settled on making a modified daisy chain, mostly because I don't have any of my super fun beads with me at my summer location of residence [if only I could bring my craft room with me everywhere!].


And I'm pretty pleased with the result :] If anyone wants to make one too [it's really simple, I promise!] then just hit me up with a comment or something and I'll be more that happy to draft up some type of pattern.
Have a happy Thursday!