I have fully accepted that one of my ideal fashion aesthetics is the idea of "casual nerd."
Like the kind of thing that you can wear out in public and people who aren't in your fandom just think "Huh, that's interesting." Nothing suspicious about it. But little do they know: BAM. You're a raging nerd baby.
That is me. This is my life now.
Which brings me to one of my latest creations:
I will be the first one to admit that I have an unhealthy obsession with Lord of the Rings/The Hobbit. So much so that it's taking over my fashion choices. But let's be real here-- who wouldn't want to wear the Mark of Gandalf on your back? You never know-- it might score you a troupe of dwarfs that will take you on an adventure. And I'm all about that adventure life, yo.
This was actually really quick and simple to make since I already had the vest which mostly fit, so I didn't have to do any alterations to it. But here is what I did do:
Similar to the LOTR Biker Jacket, I started out by flipping the vest over and traced out the back panel onto a piece of newspaper. Please take note of that creepy face in the upper right corner because it haunted me for this entire project.
I then cut my pattern piece and measured it against the back. I made sure that my pattern piece was slightly larger than the seamed-out panel on the back though because it's a lot easier sewing if you're not having so hand sew through multiple layers of denim.
On a separate piece of paper, I traced out my Mark, making sure that it would fit nicely onto my other pattern piece. I decided to go with the mark that Gandalf puts on Bilbo's door in the first Hobbit film, akin to the general rune for "G" that he uses in other parts of the films. Though to be fair, I have recently learned that the mark that he used in the movie was more of a Peter Jackson invention, rather than a strictly canonical mark, but that really doesn't really bother me much. If' you're interested in what I'm referring to, check out this informative thread.
Anyway, I digress.
Once I was sure that my pattern pieces were just how I wanted them, I pinned them down, traced them onto felt and cut them out.
After cutting them out and putting them on top of the vest though, I thought that it looked a little plain, so I decided to make an adjustment.
(shout out to my foot in this photo)
I took the Mark, pinned it to some red felt, and cut around it, making about a half inch border all the way around.
And then I had to take a quick interlude because someone was hogging all of the fabric. Wow. Jerk.
I liked this look way better so I pinned the grey to the red, sewed that down, and then pinned the red to the black before sewing that down too. I just did a whip stitch all the way around because I like how that looks. I don't have a better reason.
Lastly, I took the whole thing and sewed it down to the vest using the same stitching as before.
Bonus: Look at this picture of Kitty going into warp speed.
And kachow.
More nerd. More Hobbit. With a slightly punk-rock, I'ma-beat-yo-ass-if-you-talk-trash-about-my-wizard kind of vibe. (You can talk trash about Thorin though. Hit me up if you ever want to have a debate about Thorin with me.)
So what do you think? Anyone else out there who would be willing to join Gandalf's gang? Because I'm ready to go.
Linkin' up:
x x
Showing posts with label sewing project. Show all posts
Showing posts with label sewing project. Show all posts
Sunday, August 9, 2015
Saturday, June 6, 2015
Librarian Dream Dress
Story time:
So once upon a time during my junior year of college I was walking home from an afternoon class, you know just minding my own business and such. I decided to mildly dress up that day because it was nice out and because why not. I had on a high-waisted skirt that I had belted, and some top of which I don't quite remember. But anyway, I had almost gotten back to my apartment when I crossed the path of some younger children (by children, I mean like.... freshmen who were only a year or two younger than me) who were sitting on a roof yelling things at people. When I walked by, one girl looked at me and kind of scrambled to say "You look like a librarian." And all I could think to say back was, "Yes. Thanks. That's what I was going for."(because to be honest, I probably really was going for that) Then I smiled and continued on my way while she gave me the most condescending, bewildered look.
The reason why this throws me off is because I genuinely don't know... was that supposed to be an insult? A compliment? An observation? I take it as a compliment, but I think she was trying to offend me. Considering the fact that I lived at the library (No joke. Slept there, brushed my teeth there, you know, normal stuff) I take that to be a certain degree of praise.
Where was I even going with this story? We just don't know.
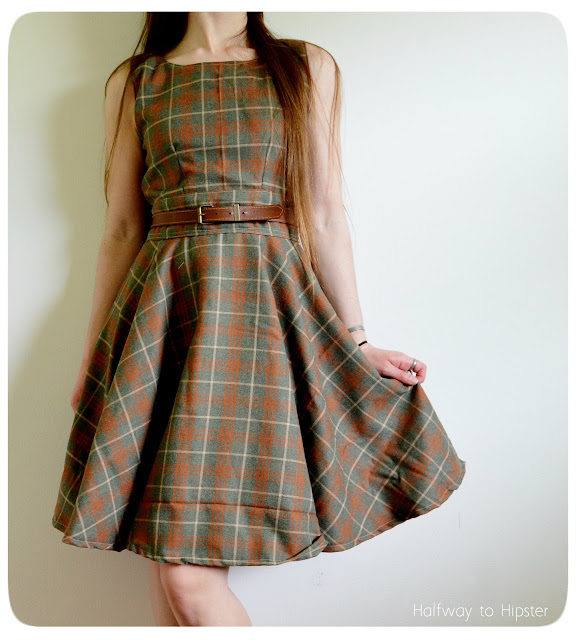
Oh, it has something to do with this dress I made:
That's right kids, I have finally made my first completely self-drafted dress. It was kind of an adventure since I've never gone fully pattern-less on a dress before, but I'm so stoked about the final outcome. It's like... If I was genuinely a stereotypical librarian like that girl had said, this would be my prefect dress. Hands down. Care to see how I made it? Then read on: (Prepare for an image heavy post, yo.)
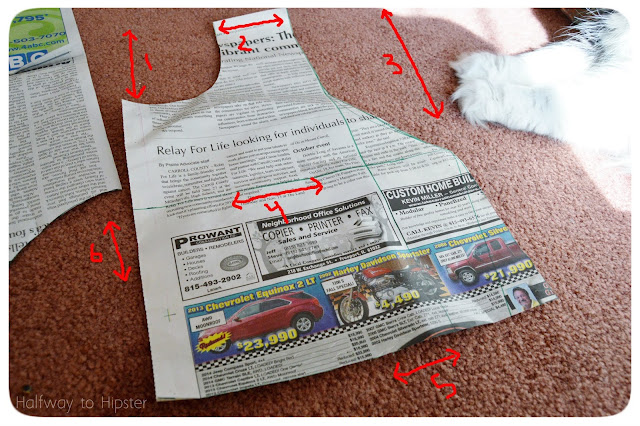
After poking around the internet for a while and looking at some other patterns that I had, I found out that I needed a few different measurements to make the bodice. (Do you like my jank drawn on measurements here? Can you tell I went to art school yet?) They were:
1. How far I wanted the neck to come down
2. Width of the strap
3. Armpit hole length. I'm sure that there is a more technical term for this.
4. Bust divided by 4
5. Waist divided by 4 (which actually, I ended up just keeping the same length as my bust and fit it with darts later)
6. How far I wanted the bodice to come down
To all of these measurements, I added on seam allowance too, just because I was super paranoid about everything being too small.
For the skirt, I just used a circle skirt pattern that I had made for a previous project. If you've never made a circle skirt before, I've posted about it here.
Once I had my patterns made, I began cutting them out of my fabric. The fabric I got for a totally awesome deal-- I found about three yards of it at the thrift store for some ludicrous amount like... four bucks or something. It just looks so 70's to me and I love it. But since I had so much fabric, I had enough to line the bodice as well. So, I cut two of these on the fold of the fabric, and four that were not on the fold of the fabric.
Since the fabric wasn't quite big enough to cut my entire circle skirt out as one piece, I traced the pattern twice on the fold to make my skirt.
To attach the skirt to the bodice, I also cut out a waistband which was about... idk... 5 inches by my waist measurement (plus and inch for seams).
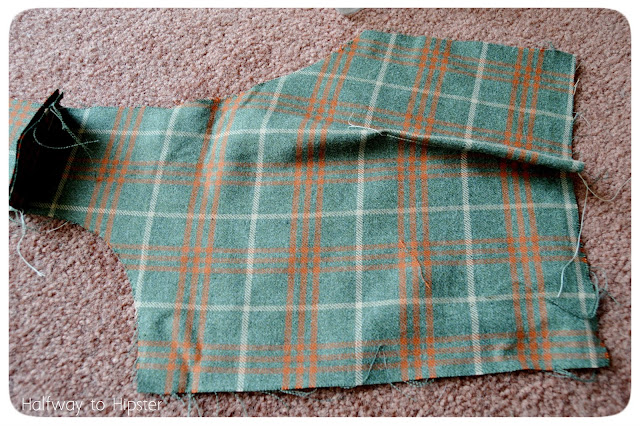
Once I had everything cut out, I started the whole assembly process. I first pinned the front of my bodice pieces to their corresponding back panels just at the shoulders and sewed that down. I then used darts in both the front and the back to taper the bodice so that it fit my waist better. This involved a little math and pinning and unpinning the sides and trying it on to make sure I wasn't taking it in too much. Basically, I just wanted that bottom edge to be the same width as the waistband I cut out.
See. Darts.
Next, I laid my pieces on top of one another right-sides together and made sure that everything lined up.
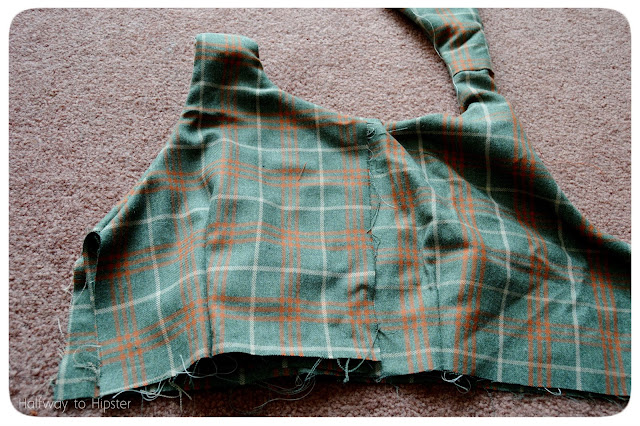
Once I was sure that everything lined up, I pinned down the armpit holes and neckline and sewed these together.
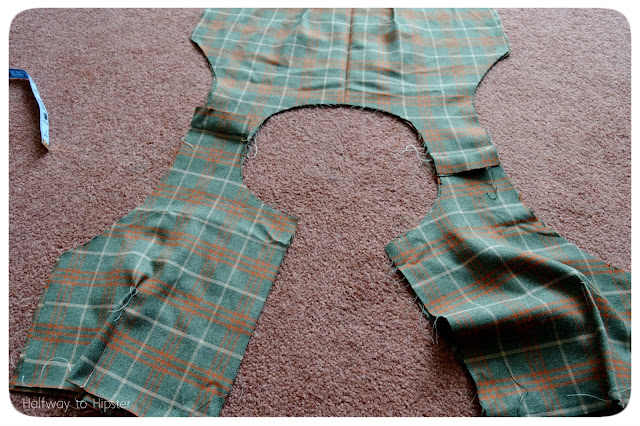
To turn the bodice right-side out again, I had to shove those back panels through that tiny opening that is the straps. I don't really know how to explain that, but does the picture kind of make sense? Basically, it was like the bodice had to give birth to itself.
But once I managed to deliver the top, it looked like this. So I lined up the sides and made sure that it looked fine in that regard.
To finish off the bodice, I had to do another thing that is kind of hard to explain. Instead of having raw, fuzzy edges on the inside, what I did was first pin just the two innermost layers together. This allowed me to open up the whole top, pin the outermost layers together, and sew the whole side seam as one straight line. I know that doesn't really make sense, but it's super hard to explain so hopefully the picture makes a bit of sense? Once that was done, all I did was topstitch the neckline and arm holes.
Once I tried on the bodice and made sure it fit, I attached the top to the bottom using my waistband piece, which I made nice looking by doing all my attaching on the inside of the dress.
The final step was just to pin in a zipper, make any last size adjustments with those pins, and then just sew the zipper in. I mean, there are still a few fit issues with this, but I'm still super stoked with the outcome. I didn't think that I'd ever trying making a dress completely from scratch, but here we are. What a time to be alive.
Dang roof girl, if only you could see me now...
So what do y'all think? Any advice on how I could do better for next time? Any advice on pattern-making is MORE than welcome because I am still such a novice.
Linkin' up:
x x
Tuesday, April 28, 2015
DIY Hi-Lo Circle Skirt
First thought: Is that plaid I spy?
Second thought: WAIT IS THAT FLANNEL??
Good news, self. It both.
They were just these 3 yard rolls of flannel that were only 5 bucks each, so I got two of them. Fast forward to present day and I finally made a thing:
I thought about making just another regular circle skirt because let's be real- you can never have enough of those. Or at least that's just what I keep telling myself so that I can sleep better at night. This time though, I decided to try out a hi-lo style and I'm per' excited about the result. So here is how it went!
I started off by rolling out my fabric just to see the dimensions and I made a paper pattern. For how to make the paper pattern and do your measurements, you can refer to my post about making circle skirts.
I then [with the help of Kitty] cut out just one quarter of my skirt. How I did this was instead of folding my fabric at all, I laid my quarter-skirt pattern out on just one layer of fabric and cut it out. No folding or anything required.
After cutting out the one quarter, I proceeded to flip and lay my pattern down again and cut out a second quarter. These two regular pieces are what I used for the high front of the skirt.
For the back of my skirt, the "lo" part of the hi-lo equation, I started out by tracing out my quarter-pattern twice right next to each other, flipping halfway through the process so that I traced out a half circle instead of just the quarter circles like I did for the front of the skirt. Now, instead of cutting the exact shape of my pattern, I cut it so that the back angled down further, so that it would create a low effect.
I forgot to photograph this part, but I assembled the skirt by just sewing my two front quarters together and then sewing them to the back half.
With my remaining fabric, I cut out a waistband that was about four inches wide by my waist+2 inches [actually, I think I only did it about an inch and a half bigger than my waist, but two inches is a safe bet if you're worried about it not fitting].
Like with all my waistbands, I folded the fabric in half and ironed it down.
I then opened it back up and folded the edges halfway to my center crease.
I attached the waistband to the skirt by encasing the top of the skirt fabric inside the little refolded waistband and running two lines of straight stitches around the whole deal. I should also note that I cut a line for the zipper in the middle back of the skirt before I attached the waistband.
To finish the skirt off, all I did was insert a zipper, make a matching bandanna for Kitty, and just like that we are matching wonder babies.
Now here, have a baby bird pose. Because we all needed that.
And some sweet hi-lo action. I should really stop taking photos at awful times of day when there is no light left. Shame on you Becca. Stop bringing dishonor to your family.
But anyway, there we have it! This skirt was pretty simple to make, and nothing beats the feeling of being a girly lumberjack child [if you've never tried that aesthetic, I highly recommend it.].
Linkin' up:
x x
Wednesday, December 10, 2014
The Modern Thranduil Dress
(Carolyn can back me up on this one)
Now, if you've been reading this blog at all, you might have noticed that I'm just a tad attached to elves and other nerdery. Which is 105% okay with me because elves are so important. SO important.
In order to celebrate my love of Tolkien and to get even more psyched for BotFA, I couldn't think of a better time to share what I made for my Halloween costume this year. But Becca, wouldn't Halloween have been a good time to share your Halloween costume? Shhhh, no.
But not going to lie, this is quite possibly one of the best dresses that I have ever created. Not that I'm biased or anything...
I knew that for Halloween I wanted to dress as Thranduil because I have so many elven feelings, but I really didn't know how to go about making any of his outfits. I mean just look at this majestic being:
 |
| Source: x |
So instead of trying to figure out how to create his robes with my limited sewing skills, I decided to go with something more cute and wearable.
And in the end, I'm actually really excited by it. Here is what I did to make it:
I then used my trusty New Look pattern that I use for everything to make the bodice of the dress.
I knew that I wanted to do something that was a little more elaborate on the bodice rather than just leaving it plain grey, so I decided to do some stitching to mimic the look on his original robes. I did this by pinning down the middle fold of the bodice and started to pin some matching angles meeting at the middle.
Just so. many. pins. Which I then stitched in with tan and black thread. Then I just attached the bodice to the circle skirt, hemmed it up, and threw in a zipper. I decided to wear the dress over a grey chiffon shirt I had, as well as a red circle skirt that I had previously made. And now I have a Thranduil-inspired dress to frolic in whenever I please. Which is everyday. All the time.
Because who wouldn't want to pretend to be an Elven king? Especially one as precious as the party king himself.
Also, as noted many times in the past, I am the most awkward picture-taker on the planet. Actually, I'm just an incredibly awkward person in general... but I did have fun screaming at walls and pretending to shout at dwarves while photographing this dress.
Now I'm going to see how many times I can wear this outside of Halloween before people start to notice/become concerned... Hello all future family functions (I'm already "the weird socially awkward art school graduate." This shouldn't phase anyone in my family). (Also, check out that alliteration).
So, anyone else as pumped as I am for the final Hobbit installment? Because I'm not sure I'm emotionally prepared...
Linkin' up:
Subscribe to:
Posts (Atom)


