Pages

Wednesday, December 10, 2014

The Modern Thranduil Dress

In case you were not aware, The Hobbit: Battle of the Five Armies comes out in exactly t-minus one week. Needless to say I am so excited and emotional.

(Carolyn can back me up on this one)

Now, if you've been reading this blog at all, you might have noticed that I'm just a tad attached to elves and other nerdery. Which is 105% okay with me because elves are so important. SO important.

In order to celebrate my love of Tolkien and to get even more psyched for BotFA, I couldn't think of a better time to share what I made for my Halloween costume this year. But Becca, wouldn't Halloween have been a good time to share your Halloween costume? Shhhh, no.


Modern Thranduil Dress


But not going to lie, this is quite possibly one of the best dresses that I have ever created. Not that I'm biased or anything...

Modern Thranduil Dress

I knew that for Halloween I wanted to dress as Thranduil because I have so many elven feelings, but I really didn't know how to go about making any of his outfits. I mean just look at this majestic being:

Source: x

So instead of trying to figure out how to create his robes with my limited sewing skills, I decided to go with something more cute and wearable.

Modern Thranduil Dress

And in the end, I'm actually really excited by it. Here is what I did to make it:

Modern Thranduil Dress

First things first, I made a simple circle skirt for the bottom of the dress (with the overseeing eye of Kitty, of course).

Modern Thranduil Dress

I then used my trusty New Look pattern that I use for everything to make the bodice of the dress. 

Modern Thranduil Dress

I knew that I wanted to do something that was a little more elaborate on the bodice rather than just leaving it plain grey, so I decided to do some stitching to mimic the look on his original robes. I did this by pinning down the middle fold of the bodice and started to pin some matching angles meeting at the middle.

Modern Thranduil Dress

Just so. many. pins. Which I then stitched in with tan and black thread. Then I just attached the bodice to the circle skirt, hemmed it up, and threw in a zipper. I decided to wear the dress over a grey chiffon shirt I had, as well as a red circle skirt that I had previously made. And now I have a Thranduil-inspired dress to frolic in whenever I please. Which is everyday. All the time.

Modern Thranduil Dress

Because who wouldn't want to pretend to be an Elven king? Especially one as precious as the party king himself. 
Also, as noted many times in the past, I am the most awkward picture-taker on the planet. Actually, I'm just an incredibly awkward person in general... but I did have fun screaming at walls and pretending to shout at dwarves while photographing this dress.

Now I'm going to see how many times I can wear this outside of Halloween before people start to notice/become concerned... Hello all future family functions (I'm already "the weird socially awkward art school graduate." This shouldn't phase anyone in my family). (Also, check out that alliteration).

So, anyone else as pumped as I am for the final Hobbit installment? Because I'm not sure I'm emotionally prepared...


Linkin' up:
x x


Saturday, December 6, 2014

DIY Circle Skirt

Fun fact: I'm not a huge fan of wearing short skirts.
Additional fun fact: Most clothing stores that cater to people my age only sell short skirts.

You see my dilemma?

Therefore, along with refashioning, I've super gotten super into making my own skirts and dresses, and it's actually easier than you might think! I made two circle skirts at the end of the summer and have already worn them so much that I'm plotting to make like.... 87 more.

DIY Circle Skirt


Circle skirts are just so much fun to wear and make. They're super easy to construct and they're perfect for twirling in. Not that I like to stand around in my living room and twirl around like an idiot in them. Nooo, no, def not me. Nah. For this first one, I found this red suiting fabric at Joann's and loved the color of it. It's less of a hoochie red and more of a deeper red, but either way, it's pretty fab.

DIY Circle Skirt

I also made a second one out of black suiting fabric because suiting fabric is just... yes. Last time I was home my friend Carrie and I had a very deep conversation about our love of suiting fabric, so trust me. It's legit.

Interested in making your own? Because you should be. Because like I said-- prime twirling.
Well the best resource I found on constructing your own circle skirt can be found with the lovely Annika Victoria, and her tutorial can be found right here. I seriously love the stuff she makes so if you have never seen her site before, please check it out!!

I followed her tutorial pretty much throughout the whole process but with a few alterations here and there.

DIY Circle Skirt

First things first, I laid out my fabric, folded it with selvages together, and then folded it again the other way just like in the tutorial. Naturally, Kitty apparated out of nowhere to lend his sewing expertise and critical judging eye.

DIY Circle Skirt

Then, using chalk and a measuring tape, I marked in my measurements. My waist measurement came out to about 4.25 inches and for my length I did about 22 inches. If you don't know what measurements to use, then there is also this handy dandy calculator which tells you what to do so you don't have to math yourself. Because everyone knows that no math is the best kind of math.

DIY Circle Skirt

Also, whilst cutting it my skirt out, I found that the center piece makes a great hat/cat-judgement blocker.

DIY Circle Skirt

The only thing that I really did differently from Annika's tutorial was the waist band. Instead of cutting one piece of fabric and folding it over, I cut two pieces that were about 2.5 inches tall and about an 1.5 inches bigger than my waist. I then did a straight stitch along one of the long edges.

DIY Circle Skirt

And then I ironed it like so, pressing my seam inside and the two remaining edges up so that I could encase the raw edge of skirt, thus eliminating all raw edges. (Oh yeah, and fabric switch here because I only remembered to photograph the black and not the red at this point.)

DIY Circle Skirt

Then instead of just doing one straight stitch along the bottom hem, I actually did two rows of stitches. I found that this actually made my bottom hem sit flatter.

DIY Circle Skirt

And it's just as simple as that! Yay for not having to wear skirts that are so short that every passerby gets a free show... 

So don't be surprised if I make about a thousand more of these because *spoiler alert* I bought a lot of suiting fabric (and other fabric, to be fair) when I was home on black Friday. Get psyched!

(Pssssst. Also.Those shoes are a DIY. Just saying.)

Linkin' up:
x x 


Sunday, November 16, 2014

80's Dress to Hi-Lo Skirt Refashion

Greetings good people :]

I know that I've been pretty absent lately, and that makes me mega-sad, but hopefully I can do something about that! A lot has happened for me personally over the past... however long it's been, including moving away from all my people, getting my first big-kid post-grad job, and other various hiccups that come along with living in the real world.

But I have been at least somewhat creative in the meantime!

For example, I have done a few refashions, as well as worked on a few art pieces, which I hope to share some time soonly. In the mean time, here's a thing that I did manage to work up:


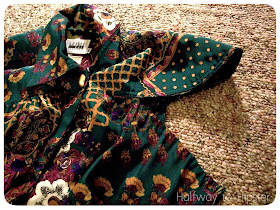
80's Dress to Skirt Refashion

Gosh, I do love me some ridiculous 80's patterns [as well as giant 80's hair, which I decided to rock today]. They're just so ridiculously fab, how could you not love... whatever that is?

This refashion was not what I initially intended it to be. Originally, I thought that I was just going to keep it a dress because I loved that great gold button at the collar, but, well.. you'll see.

80's Dress to Skirt Refashion

I started off by taking out the shoulder pads because while the linebacker look is great, it's just not my deal.

80's Dress to Skirt Refashion

Then I started cutting off one of the arms of the dress following the curve of the weird shoulder-region.

80's Dress to Skirt Refashion

When I got to the other sleeve though, I ran into a major snag. I got a little zesty with the scissors and cut the curve way too far, practically all the way to where the buttons are. Oops. Wild woman over here. So I decided to go a different route because yay problem-solving.

80's Dress to Skirt Refashion

I decided that this dress actually wanted to be a skirt the entire time, so I gave into its wishes and cut the whole bottom of the dress off.

80's Dress to Skirt Refashion

I then folded it my raw edge over once very small-like and sewed that down. I then folded it over again to create a casing for some elastic to be threaded through. I left a small section open though so that I could put the elastic in.

80's Dress to Skirt Refashion

I measured a piece of 1" elastic around my waist so that it was comfortable, then added about an extra inch to that measurement so that I'd have a seam allowance.

80's Dress to Skirt Refashion

I threaded the elastic through the hole in the casing, then sewed the two ends of the elastic together...

80's Dress to Skirt Refashion

...and then I closed the hole in the casing.

80's Dress to Skirt Refashion

All I had left to do was give my skirt a subtle hi-lo hemline by folding the skirt in half and cutting the hem on a slight curved angle. Then I hemmed up my raw edge and BOOM. Done.

80's Dress to Skirt Refashion

Although this refashion wasn't what I expected or intended, I quite like the result! The hi-lo effect is not over the top, so I kind of like the subtlety of it all. I guess this refashion was just one of those happy accidents :]

So, any other accidental refashions out there?
I'll be linkin' mine up, for sure
x x x

Sunday, June 29, 2014

Making Monday

Welcome to Making Monday

Greetings everyone! I'm super excited to announce that the lovely Gracie and Lori have allowed me to be a cohost for Making Monday this week! This is my first time cohosting, and I'm super excited to be a part of their fun weekly shenannigans. So with out further ado, here we go--


MMcohost-47
This is a party where you can find fun new creative ideas and tasty recipes shared by amazingly talented people. Every Monday bloggers stop by to link up their posts and share with all you party goers. By joining in {both bloggers and non-bloggers} you will discover new blogs, be inspired to make something new, try a yummy new recipe, and most importantly make new friends!
This party is hosted by Gracie and me, and your projects will be shared on both of our blogs. We love that you're here and we love featuring you on our social media so be sure to follow us so you can see if your post gets shared!
We also pin to our Making Monday Pinterest board and we'd love to have you follow along! This is a place you can find projects from all the previous parties, too, so it is like a party every day.
Co-host label
Becca from Halfway to Hipster.
Tulle Skirt-HalfwaytoHipster
Becca is sharing her fun and flouncy Tulle Skirt ~ make one for yourself or for a cute little princess that loves to dance and twirl.
Now make sure you show Becca some love! Visit her here: Blog | Pinterest.
 

This is what your hostesses have been up to lately:

Tomato Pesto Pizza
Whether this Tomato Pesto Pizza is cooked on the grill or in the oven, it's a summertime favorite because the flavors are delicious and refreshing.
 

These are the fabulous features for this week, chosen by Lori:

Feature47-Collage1
 
Feature47-Collage2
 
If you were one of the features PLEASE grab a button and share it with some friends.
A Bright and Beautiful Life
 
If you weren't featured this week, don't forget to check out the Pinterest board and keep linking up ~ next week could be you!
A Bright and Beautiful Life
 
Don't forget to check out our Pinterest board where we pin plenty of projects from each party!
MakingMondayGuidelines

On --

Wednesday, June 25, 2014

DIY Tulle Skirt

Greetings kids!

So, I've been doing a lot of sewing lately because when the urge to sew hits me, it hits hard. Like a semi truck. Or my dog running a thousand miles per hour because she is a dog and has nothing better to do with her time.

But because of this urge, I've been making a lot of skirts lately. One of the more ridiculous ones I've made has been this monstrosity [as featured in an obligatory mirror selfie because why not]--

DIY Tulle Skirt

Care to make one for yourself? [Because you should. Everyone should dress like a princess at least daily]. Then follow along!

DIY Tulle Skirt

This one started out with me scrounging through my basement and stumbling across five yards of white tulle. Where did it come from? Eh, no one knows. Which automatically makes it mine. For the lining, I also used about 2 yards of white broadcloth, plus another 1/4 yard of broadcloth to make a waistband. Oh yeah, and don't forget a zipper and matching thread and a sewing machine and all that nonsense.

DIY Tulle Skirt

After gathering my materials, I summoned my trusty Kitty helper and began cutting the fabric. All I did was cut the broadcloth in half lengthwise, and did the same thing with the tulle.

DIY Tulle Skirt

With the extra scrap of broadcloth, I cut out a rectangle that was 3" x 29" [or your waist measurement plus 2 inches for wiggle room].

DIY Tulle Skirt

Also, [very important step] with my extra tulle that I ended up with, I tied it to my helper's collar because he is a beautiful fairy princess.

DIY Tulle Skirt

Next, I gathered my layers of tulle and broadcloth, which I did separately and then attached together. Using the longest stitch length available, I ran two rows of straight stitches close together along the entire length of the broadcloth, making sure not to backstitch and  to leave pretty long threads after running the rows. Then, pulling on just the top threads [or bottom, doesn't matter], I gathered the broadcloth so that it was the same length as my waistband. I then did the same exact process with the tulle.

DIY Tulle Skirt

Then I attended to my waistband itself. To make life easier, I pressed it in half lengthwise, then pressed  the sides up again about 3/4"

Halfway to Hipster: DIY Tulle Skirt

Here's what I mean by pressing the sides up, if that makes more sense. Also, I forgot to photograph this part, but I also sewed the tulle and the broadcloth together after gathering them to the same length.

DIY Tulle Skirt

The last thing to do was attach the waistband to the skirt. How I did this was I basically encased the skirt part with the waistband. So instead of having all the raw edges poking out, I hid them inside of the waistband by attaching it thus--

DIY Tulle Skirt

Hopefully the pictures make more sense than I do because words and I aren't cooperating right now haha.

DIY Tulle Skirt

Finally, I just ran two rows of straight stitches along the waistband to attach everything together, making sure to backstitch at the ends. After everything was put together, I inserted a zipper and sewed down the back seam to make it a complete skirt!

DIY Tulle Skirt

Aaaaand booyah. Tulle majesty. I thought about trimming the tulle to make it the same length as the broadcloth, but a) that would take effort, and b) more tulle = more princess.

Now excuse me while I go frolic in the woods and speak to woodland creatures...

Linkin' up:
x x